Weekly Fashion Update~ Mint Green

Mint green has given the fashion world a refreshing taste. This cool green hue has been seen in fashion and beauty. Pastel green is such a lovely pale color that it compliments all skin types. Don’t be green with envy over girls who have mastered this pastel hue. With these outfit ideas, you’ll be rocking this season’s choice color with serious panache. Let’s begin!

Pink and green is a classic color combination, but in shades of bold fuchsia and muted green, it looks totally pretty instead of preppy. Wearing a light pastel and bright warm color helps accentuate your body and is an amazing color block. My favorite places to buy mint pants are American Eagle and Forever 21.

Pastel sundresses are always a staple for summer, but pale green is an especially on-trend shade this shade. This light sundress is perfect for a graduation, wedding, or just a Sunday out.

Flower-patterned jackets were all over the runway, and they’re a perfect pairing for a fancy dress in a matching color. Keeping the bag and shoes and dark or neutral color make the main focus on the printed blazer and minty dress. This dress is a lot more dimensional than the sundress look.

Wearing head-to-toe green is a great way to embrace mint. The contrast of light and dark shades of mint make the look not too overwhelming. Incorporating a deep colored lip into the outfit brings a lovely touch to the light colors.

An oversized sweater in a super-feminine shade pairs well with frayed cut-offs. Adding a peter pan collar to the oversized sweater dresses up the frayed shorts. Frayed boyfriend jeans would work just as well with the shorts. To dress it up even more, wear the oversized sweater with folded boyfriend jeans, nude pumps, and a brightly colored envelope clutch.

Today, I actually painted my nails mint green! I used Essie Mint Candy Apple and just a clear sparkle polish on my accent fingers.


Upcoming Fall 2013 Hair Trends!

As is so often the case in fashion and in life, the fall runways were a study in contrasts. Hairstylists everywhere breathed a sigh of job-security-inspired-relief to finally see hair that was actually done: Riotous volume at Marc by Marc Jacobs, punk pin-curls at Givenchy, and princessy plaits at Rodarte. Real women were simultaneously reassured by the simple elegance of messy low ponys at Oscar de la Renta, easy texture at Proenza Schouler, and barely-there waves at Pucci. Those of us who like a little surprise looked to Rag & Bone’s insta-bangs, created with a clever side part—no scissors in sight. I know, to some this sounds like gibberish, but Fall 2013 is going to be booming. This season, there’s something for everyone. Let’s begin!

Spring ponytails were positioned at the nape and ironed to emphasize their sleekness. For fall, the position stayed put, but textures differed. The messy, sleek, and bouncy low ponys are predicted for fall. For a messy pony, tie hair at the nape of the neck then pull small pieces of hair out to frame the face. For a sleek look, gather the hair tightly and hair spray any fly-aways. To get the adorable bouncy low pony, gather the hair a little higher than a normal pony and with a 1 inch curling iron or wand curl the hair in large sections. If you wanted to cover the rubber band with hair, take an 1 inch piece of hair from the pony and wrap it evenly around the band then tuck it into the hair tie.

Why make the commitment of full-on bangs when a simple part can give you a believable (and beautiful) approximation? These side faux bangs have been blowing up the runways. Creating a low side part and sweeping the hair over the forehead gives the illusion of bangs. For thicker and chunkier sections, bobby pin them down behind the ear.

Sometimes more is more. Limp hair is out and volume is in! To get this look, curl the hair and let the curls set. Then back brush the curls with a boar bristle brush (say that 5 times fast!). To get a more tamed look, apply a smoothing cream or a frizz spray to the intense sections. The longer the hair the more it actually looks like volume and not an afro, but short hair girls can still get volume. Just apply mousse to damp hair before styling for more control.

There’s nothing new about a braid. Braids are still at the top of the list for Fall 2013. Incorporating them into buns and peek-a-boo braids that are threaded into long hair. Some of the most popular are french, twists or plaits, reversed, princess, and waterfall. Braids are an easy everyday do for any one who only has a few minutes to spare. They are also perfect for bridal and prom occasions.

Deconstructed buns and knots are mostly situated at the nape of the neck this season. Most of them are messy with just a few hairs pulled out on the front to frame the face. To get a knot, put the hair in a low pony and then coil the hair around the hair tie and secure it with a hair tie and bobby pins. For a deconstructed bun, there are many ways. You could make a pony at the nape and then braid the pony into one braid and wrap this, much like a top knot, around the hair tie. Or you could create a low messy bun and pull it apart to your liking.

Undone curls are a hot item this upcoming fall. For extra loose curls, curl the hair with a 1 inch curling wand and then brush it out with a paddle brush. Set the look with either hairspray or massaged a light pomade through the locks. For more volumous loose curls, curl the hair with a 1/2 inch curling wand or iron and then brush the curls out. Take a teasing comb and tease the crown and large sections of curls. Flip the head over and spray it with hairspray to set the look.

The final look is one that is on the wild side. Designers all over the runways have been sporting a punk movement. Colored extensions, piecey cuts, and slicked back looks. Finally, you get to embrace your inner wild child! For the colored look without the commitment, simply rub hair chalk on certain strands. Hair chalk is great for temporary color without the Kool-Aid. It washes out with shampoo and is perfect for this look. The picture above is merely an extension pony, but buying wigs that are a different shade than the hair on the scalp creates an edgy feel. Finally, my favorite, is the slicked back look. Brush hair back and tease the front. Pin the sections near your ears back with clips and cover them with your hair. Apply gel or hairspray to alleviate any fly-aways.


How To Clean and Moisturize Makeup Brushes

Dust-filled powder brushes, foundation caked stippling brushes, bacteria filled blush brushes, and color stained eye shadow brushes can really ruin a look and clog your pores with bacteria. Cleaning the brushes should be done depending on how much you use them. I only use my foundation brush for special occasions (I usually use a makeup sponge), but since that is brush to face contact I usually clean that brush once a week. For eye shadow brushes, I usually clean the whole set every month considering I use different brushes. Let’s begin!

To start, rinse your brushes in a downward motion. Rinsing it downward will make sure that water doesn’t loosen the glue from the stem and ruin the brush. If your brushes have bamboo, be careful not to damage it with the water.

For the cleaning product, mix 3/4 anti-bacterial soap and 1/4 olive oil on a plate. Mixing less olive oil won’t make your brushes greasy and thick, but will cleanse them and keep them soft. Just take one damp brush and swirl it through the olive oil and soap on the plate. If you don’t want to use this mixture, baby shampoo works just as well.

Now, take the soapy brush and massage it onto your hand under the water. You will start to see the makeup seeping out. Keep massaging until all of the soap is just water.  Afterwards, rub the brush on your hand and if you can hear or see soap coming off keep rinsing it. Powder and foundation brushes are the hardest to rinse because they are so dense.

If you have a lot of brushes to be cleaned, then I would invest in a makeup cleaning tool. This one is from Sigma and just slips on like a glove and doesn’t ruin your hand when massaging the makeup residue out.

Afterwards, just lay the brushes out on a flat surface on a paper towel or a rag and let them dry for 3-5 hours. Now your brushes are squeaky clean and moisturized!

The Most Flattering Hair Part For Your Face Shape!

image courtesy of Yuri Arcurs/Shutterstock.com

One of the easiest ways to change your look is switching how you part your hair. While many of us find a natural part and stick with it for years, have you ever wondered if that style is really the most flattering for your face-shape? Experimenting with a fresh comb-created angle will give you a chance to find the ideal balance to highlight your features. But the best part? It’s an instantly gratifying transformation. Let’s begin!

Heart-shaped faces tend to be wider in the cheeks. A middle part complements this shape, but only if you have long hair. If you have short hair or too many layers around the face, it can have the reverse effect.  That’s because the cropped fringe will bring the focus to the wider area of your face. A side part will also work by allowing hair to covering the larger forehead and cheek area and make the face look thinner.


For circle shaped faces, use a deep side part to showcase your strongest side. Don’t know which side is your best? Use a blank piece of paper to cover half of you face while looking in a mirror. Then switch sides. Whichever half you prefer the most wins! Round faces need a curtain of hair to lengthen the shape and balance the features.


Square faces should enhance a deep side part that will soften the forehead and jaw line.  The long layers create a rounded oval by falling diagonally across the face and hiding harsher angles. The ideal place to start your deep part is directly above the arch in your eyebrows.


People with oval faces have it the easiest! They can pull off any part, any side, any way, on any style.  So why not try them all? Experiment with sides and angles for a mini makeover each day! Or try creating a youthful zigzag part.

Time Saving Makeup & Fashion Tricks!

You’re in a deep and luxurious sleep when, suddenly the radio is blasting. It’s time to wake up to get ready for work. Persistently, you just press the snooze for 5 more minutes of heaven. Which, unfortunately, turns into 30 minutes and next thing you know, you’re running late. We have all been there. Rushing into the bathroom while trying to put mascara on, zip up your pants, and eat some oatmeal before it’s time to sprint out the door. Thankfully, I have perfected these steps for all of you who aren’t early birds. This tutorial contains helpful tips and tricks to cut your getting ready time in half. Let’s begin!

To quickly get ready in the morning you must prepare at night. This means that taking a shower at night will take 15-25 minutes out of your schedule in the mornings. If you don’t want to wash your hair, then just pull a shower cap over your hair. In the morning, you can just wash your face and your body will still be clean.

Depending on how your hair dries, you might want to style it at night. My hair is naturally curly and I know I won’t have time to straighten it in the morning so I straighten it before bed. To ensure it stays straight all night, I use CHI Straight Guard after straightening. When I wake up in the morning it might have some waves, and that only takes 5 minutes thanks to my prepping. Putting your damp hair into a side braid before bed will give you beachy waves in the morning when you take the braid out.


In the morning, just wake up, wash your face, moisturize, then jump right into concealer. Skipping the foundation will alleviate about 5 minutes. If you don’t want to blend the concealer, then just apply a BB cream to your whole face. Apply a pressed powder for more coverage over the concealer or BB cream. Using an angled brush when applying a light pink blush or light bronzer will make the application quicker. Just swipe across the cheekbones and move onto the eyes. Using a liquid liner, sweep it across the lash line and make an even wing. Instead of dealing with all of the mascara, just curling the eyelashes will give it a voluminous look and only take 15 seconds. For the lips, use a tinted lip balm or a deep pink lip stain is the best. Putting color on the lips and the winged liner makes it look like you spent a lot of time on your makeup.

Pencil skirt

For a quick go-to outfit, I usually grab colored pants, neutral sandals, and a cotton top. Grab a bubble necklace , a few rings, and sprint to the kitchen. For a more work formal look, I throw on a long pencil skirt with a layered top and black pumps. Thank you to Fashiony.ru for the gorgeous example above.

Breakfast in the most important meal of the day because it gets those brain juices flowing. For a grab on the go, I usually pick a granola or protein bar and a refrigerated Starbucks Mocha Frappuccino. This whole process takes about 20-30 minutes or less.

DIY~ Customizable Chalkboard

With the school summer break coming to an unfortunate end, this DIY is perfect for those people who just need to keep track of their daily lives. All this DIY takes is an old picture frame, spray paint primer, colored spray paint, chalkboard paint, and either a hot glue gun or super glue. Let’s begin!

First, start with your good ol’ picture frame. Make sure it contains the glass piece and not just the frame. You can find them at any craft store and extremely cheap at any thrift store, like Goodwill. Take all the pieces apart and clean the frame and glass.

Spray both the frame and the glass with Kilz Spray Primer. Just like priming your  face, this will ensure that the paint stays on. This process will take a lot of spraying so I suggest that you complete this DIY outside with a tarp, or protective covering down.

For the frame, you can pick any color or just leave it the original antique color. I chose Krylon’s Spray Paint in the color Ballet Slipper. This color is a really lovely pastel pink. Spray the frame with two even coats. Put it to the side to make sure that when you spray the glass it doesn’t get sprayed as well.

Next, spray the glass with Krylon’s Chalkboard Spray Paint. Spray the glass with two even coats, and then let it sit for 5 minutes and then spray it with two more coats.

It is best to let the frame and glass dry overnight or for at least 8 hours for the best use. Waiting this long will make sure that the chemicals dry and don’t chip away. If you wanted to apply a clear coat then that would be fine, but isn’t necessary. When putting it all together, put the glass in the frame and then apply either a hot glue or industrial glue. Then tighten the clasps on the frame.

And now you have an adorable chalkboard! If you wanted more use of it then attach small circular magnets onto the back of the frame’s corners with a hot glue gun.  The magnetized chalk board could be placed on the inside of a locker or on a bustling family’s fridge. Many people spray full-length mirrors with chalkboard paint for a wall size chalkboard. Add any ribbons or stickers to make it unique!

45 Beauty Things You Can Do With Vaseline

Vaseline. Probably one of the worlds most versitile products. To accomplish these tips, you don’t have to only use Vaseline. Any pure petroleum jelly composition will work. Don’t go for anything scented though. All of these beauty tips take less than a minute to do. Let’s begin!

1. Apply to lashes found here.

2. Apply to feet a night with socks for less cracking.

3. Moisturize elbows.

4. Great for cuticles.

5. Un-chap cracked lips.

6. Create a lip gloss by putting Vaseline over lipstick.

7. Mixing Kool-Aid and Vaseline will create a lovely tinted lip balm.

8. Putting Vaseline on wrist then spraying perfume will ensure the scent lasts all day.

9. Vaseline does not clog pores so it could be used as a cheap facial moisturizer.

10. Rubbing on eyebrows can nourish the strands and make them grow faster.

11. Create a salt scrub out of bath salts and Vaseline to cleanse your body.

12. All over body lotion in the cold winter nights.

13. Rubbing a tiny amount on the teeth can make it easier to smile, especially for people with braces.

14. The non-greasy products in Vaseline are great for a relaxing massage.

15. Heated up in microwave creates a nice night cream to help open pores.

16. Applying with a napkin will remove unwanted makeup.

17. Putting Vaseline on your eyelids then applying eye shadow will create a more shimmery look.

18. To prevent lipstick on the teeth, rub a little on your two front teeth.

19. For that dewy summertime look, massage Vaseline on cheeks and mid-forehead.

20. Applying after shaving will prevent razor burn.

21. Gets rid of dry skin lines.

22. Rub a little bit on an earring  hole to make the earring glide in more easily.

23. To create a cream blush, mix your favorite lipstick and Vaseline and apply to the apples of the cheeks.

24. If your ring is difficult to get off, apply Vaseline to the base of the ring. It won’t tarnish the jewelry at all.

25. Prevents chaffing.

26. If you’ve recently had cosmetic surgery, using Vaseline will make it heal quicker.

27.  Calms poison ivy rashes.

28. Moisturizes a scalp with dandruff if applied.

29. Applying on Atopic Eczema will help it heal.

30. Protects  freshly inked tattoo if massaged onto the area.

31. Rubbing a little Vaseline on your hairline will protect it from hair dying chemicals.

32. Shines leather (especially pleather) shoes and purses.

33. Scrunch Vaseline into the ends of your hair for a more choppy and piecey look.

34. If makeup gets on your clothes, dab a small amount to the area.

35. For healthier hair ends, apply Vaseline to moisturize the dry ends.

36. To make an old nail polish bottle easier to open, rub a dollop on the cap and outer rim and it is just like new.

37. Mixing Vaseline and your favorite lotion will make it last longer.

38. Apply to the lips after you have exfoliated with a toothbrush for softer lips.

39. To remove fake lashes, apply to the lash line and then just peel them off.

40. Rub Vaseline on your dry spots before you use any fake tanning because it will eliminate any uneven tones.

41. Mix a small amount of chocolate with Vaseline for an all natural cocoa butter lotion, great for stretch mark treatment.

42. Apply to the knees to prevent an ashy build up.

43. Can be used as an eyebrow gel to help sculpt the perfect brows.

44. Massaging a dime-full into your scalp works wonders as an after-salon treatment.

45. Rub Vaseline onto your nails to enhance the longevity of nail polish.

DIY~ Infinity & Wire Rings

Rings are one of my favorite arm candy accessories. The simpleness of a wedding ring to a large statement ring are so versatile. But how do you make your own rings and all under 10 minutes? This DIY is very simple and can be done by any one. The wire colors can be changed on all the styles. And you can add charms, beads, or paint the wires to all rings. Don’t be afraid to add you own pizzazz. Let’s begin!

diy infinity wire ring

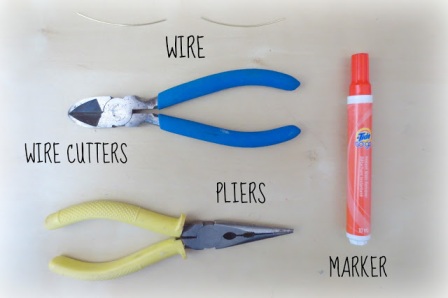
All you will need is pliers, wire, wire cutters, and any marker. If you have a ring sizer then that would work better than a marker. You can use any color or thickness of wire.

diy infinity wire ring

Take your pliers and curve the end of the wire towards a point on the wire.   Make sure that it touches as close as possible to the wire (mine get pushed in more later on).  Do the same thing on the other side and make that first curve.  I used my finger nail, but if you’re a bit more unsure, use some pliers to make that bend.

diy infinity wire ring

Take that end of the wire, the end that doesn’t already have the finished half of the sign, and flip it over, crossing it to the other side as you can see in the photo.

Cut off the excess wire and you have your infinity charm. If you wanted more of a full-circle infinity charm, then don’t cut the excess and just fit the rest of the wire to your finger.

diy infinity wire ring

Now, on to the band.   Wrap your second piece of wire around your marker.  Try to get it hugging as close to the marker as possible.   Then put it on your finger and push it together a bit more so that it fits better on your finger.  Cut off a bit of the excess, but not too much.  It should almost be able to form a full circle.

diy infinity wire ring

Curve  the ends of the band slightly so you can clamp the charm onto the ends. The ends should be like little hooks on the charm.

diy infinity wire ring

If everything turns out alright, you should have a bit of excess wire on the other side of the band, enough for you to repeat the previous band-curving steps.  Do that and slip that end of the band through the other end of the sign.  Clamp it down like before on the other side.

diy infinity wire ring

Tada! An original infinity ring that only took 10 minutes!

For other styles, do the same steps except make a heart charm out of the wire rather than an infinity symbol. For a bow ring, don’t make the clasps, just measure it around your finger and make sure there is excess to form the bow, then wrap the bow to form it’s shape.

To form a Love ring, follow the same steps as the infinity ring with the band that gets clamped down, but add the Love charm. To create the charm just mold into “Love” in cursive with the pliers. Cut it off after the “e” so it doesn’t get too long.

For a snake-like ring, make a small circle with the wire and then start zig-zagging it in a snake-like way. When you get halfway, wrap the wire around a pen full-circle then keep doing the zig-zagging until you want the design to finish. End with another little circle, and slip it on your finger!

To create the Chevron rings, simply wrap the wire around your finger or a marker and cut it off so it can go all the way around. Place it on your finger and then form the Chevron shape. Adding more Chevron rings adds more dimensions. To add more flare, paint the Chevron rings over the wire or add small beads or gems. The Chevron rings shouldn’t go past your knuckle.

How To Walk In High Heels Like a Pro

As crazy as this seems, many women still haven’t mastered the art of walking in heels. Hundreds of style-hungry ladies skip the heels section each day because of a fear of the unknown. You won’t necessarily be walking on 5 inch heels by tomorrow, but these steps can help you feel like you aren’t walking on stilts every time. Being a person who was weary of heels in the beginning I know how you feel, but today I wear heels 2-3 times per week for about 7-8 hours per day. Let’s begin!

I’ve been wearing heels since I was a teenager so my feet have been thoroughly trained to be in heels. If you are just starting out, don’t immediately go for the stilletos.  Get some heels between 2-3 inches and preferably with a bit of a thicker heel and wear them around the house. Wear them when you are cooking, wear them when you are doing your makeup, when you are vacuuming, walk up and down the stairs, etc…  You don’t need to even get dressed up, just walk around and wear them in your sweats, nobody will see you but if you wear them during normal activities without leaving the house, you will get a lot more used to them and not feel foolish because nobody will see you practicing.  I do this when I’m breaking my shoes in and it helps a lot in that aspect as well. Practice truly makes perfect and the more you break in the heels the more comfortable they will be.

Nothing looks worse than a girl who’s wearing shoes that are too big or too small and you can see them visibly struggling to walk in them.  I wear different sizes with different brands and even within the same designer I can go up or down a half size so make sure that you are wearing the size that fits your foot and not just the size that you “usually” wear. To help with sizing you can also get insoles. When you are buying shoes, walk around the shoe department in them and make sure that your heel doesn’t pop out or it’s not squeezing your toes or the sides of your feet. Don’t think that shoes will stretch because most of the time they won’t stretch enough and they’ll still be too tight to wear.

Walking slow is much better than trying to keep your normal pace and then falling on your face.  Don’t feel silly for walking slow or taking small steps.  I mean don’t walk abnormally slow (if you do, you may need more practice) but look around you, there’s always a ton of people walking slow and you probably don’t stare at them weird or anything do you?  So ignore your own self conscious feeling of “dang people are probably staring at me because I’m so slow” and just take your time walking.  If you have to go up or down stairs, always hold on to the handrail or your significant other to keep steady.  It sounds silly but I’ve seen people take tumbles because they didn’t have anything to hold onto but if you are wearing heels, you have a higher chance of slipping or getting your footing wrong when going down stairs.

When I know I’ll be walking a lot, I always carry a bigger handbag and put a pair of flats in there. Then when I’ve been on my feet for a couple of hours and I need to give them a rest, I’ll just slip on my flats, put my heels in the shoe bag and my feet are back to being comfy! There are even flats out there like these Dr. Scholl’s Fast Flats that are foldable flats and are really compact to keep in your handbag.

Tips:

If a stiff shoe causes blisters, spritz the body with water and use your fingers to mold the softened leather to the shape of your foot or try special inserts to reduce friction.

The inner arch of the heel, or the breast,  affects stability. The farther forward the arch, the less you will feel off-balance.

Slipping on slick floors? Pick up a pair of sole protectors or score the soles of your heels with a key to create extra traction.

If your toes feel pinched, have the toe box stretched out at your local shoe repair shop.

If you suffer from low arches, slip in supports to relieve pressure on the balls of your feet.

Waterproof Makeup Tutorial!

Unfortunately, not all makeup can withstand the earth’s elements. We have all been there where you come out of the pool and mascara or that smokey eye is just oozing down your face. Thankfully, I have found this full face makeup look that can defend itself against water and sweat. This isn’t the best every day makeup, unless you come into contact daily with water. Let’s begin!

For a full-coverage foundation, I would recommend the Makeup For Ever Full Cover foundation. You could apply a primer under this foundation, but it is so waterproof it isn’t completely necessary. It can be a little pricey, but it has true full coverage and the lady at Sephora said this is the only absolute waterproof foundation. Apply this with a foundation brush and use Covergirl Clay concealer to cover up any redness and under-eyes. Using a clay concealer is a lot thicker than a liquid and will cling to your face better. If you don’t want a heavy foundation, then apply Physicians Formula BB cream for moderate coverage.


On the eyelids, I apply Maybelline Color Tattoo in the color Tough as Taupe. This cream eyeshadow is waterproof and is a shimmery gold that reflects the sun with your eyes making them looks brighter. If you prefer a more smokey look, go for the Revlon cream eye shadow palettes. They come with four sets of shadows and come in hundreds of color sets. For a pop of summery color, using a angled liner brush apply Tenacious Teal to the under eyelids. If you wanted a black winged liner instead, a gel liner swiped with an angled liner brush will do the trick.

The Colossal mascara by Maybelline is an amazing waterproof mascara. This mascara won’t come off for anything. Curl the lashes then apply even coats. Tip: Don’t apply mascara to bottom lashes because it could increase the risk of bottom lash line makeup dripping off in the water.

For blush, I sweep Dream Bouncy blush across my cheekbones for a natural flushed look. Dragging the blush up into the temples will give more structure to the face. Applying a light pink or coral lip stain is best because it won’t come off. And that’s it! You are now ready to jump into the ocean and ensure that your face will stay on all day.

Previous Older Entries

Enter your email address to follow this blog and receive notifications of new posts by email.

  • 151,438 beauties!