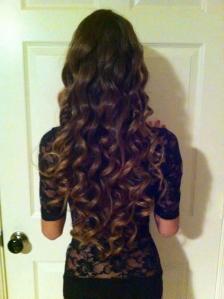
Curly versus straight. That, my friends, is the question. Whether it’s formal events or just something different, I love to curl my hair. With upcoming graduation and summer, I thought this tutorial would be perfect. Time to ditch those thick jackets and dive into crop tops and gorgeous curls. This look is very low maintenance and only requires a curling device, hairspray, hair tie or large clip, hair protectant, and a comb or brush! Other essentials can be added to create more volume. Let’s begin!
This look can be either used with clean hair or 1-2 day old hair. The older hair holds a curl better because of the excess oils already in the hair, but you don’t want really greasy curls. For this process I used a curling wand. I prefer a wand rather than the curling iron because, for me, it speeds up the process because you don’t have to use a clamp and the curls are a lot more fuller. My curling wand is the Remington Pearl Ceramic Ultimate Curling Wand. I seriously love this wand more than anything. I have the smaller one because I like the tighter curls and being able to brush it out for looser ones. The great thing about this wand is that the base is 1 inch and it decreases to 1/2 inch as you continue down, allowing different size curls. It says it is “infused with pink sea pearls” on the box, which is kind of weird, but it does have a smooth texture on the barrel. I got it at Walmart, and is available online too, for only $21.49, without tax.

To start off, plug the wand into an electrical outlet and set it to whichever heat setting you prefer. I usually set it to one click before the highest of 410 degrees. Next, add a heat protectant. Since we are using such high temperatures this is a necessity. At these temperatures you could bake cookies on your curling iron! The heat protectant I have been using for years is the Tresemme Heat Tamer Spray. It seriously works and was voted one of the best heat protectants in several beauty magazines. Spray this all through the dry hair and gently comb it through with a wide-tooth comb. I suggest using a wide-tooth comb because it is a spray and will dampen your hair, so if you slam a brush through there it will create damage.

Next, separate your hair at the crown and either pin it up with a large clip or tie it back with a hair tie in a small bun. If you want to add a frizz-calming spray, now would be the time. Gently massage either a frizz cream or Argan oil through the separated pieces. Now, it’s curling time! Take a 1 inch portion of hair from the separated pieces.

Now wrap the hair over the bottom of the curling wand starting the closest towards your hand. Wrapping it around this way will create a fanned-out look that will make your face appear brighter. Twist around the full wand and hold it for 8-12 seconds. Depending on how thick your hair is the times will be different for all. Once you release, the trick to beautiful curls is to cup the curl in your hand. Meaning, as you release the curl let it curl up in your hand as it lets go from the wand. To do this, put your hand towards the end of the wand with your palm facing upwards. Release the curl and the curls should form a little circular section on your hand. Hold in there for 3-5 seconds and it will ensure the curl will hold its form because it cooled in the coiled position. Once you finish that side of your head, hairspray the curls. For the other side, you will need to switch your hand position, but keep going under the barrel of the wand. Hairspray each side then release the clipped sections and continue curling them. Not everyone is going to need as much hairspray for every section. Many just spray at the end, but hair-spraying does keep contain the look all day long.
For super natural, shiny curls I recommend using Suave Vibrant Shine Spray after the whole head of hair as been curled. This will bring a healthy glow to the curls and make them more inviting. This product is available at drug stores and is extremely inexpensive. The part I love the most of this product is that when you shake it up you can seen little sparkly minerals inside it. Yet, when you spray it the outcome doesn’t look like childish with sparkles everywhere and you can’t even notice the sparkles. I also love that the product is a liquid spray, but when you apply it, it doesn’t make your hair wet. It’s like a dry spray and works wonders.

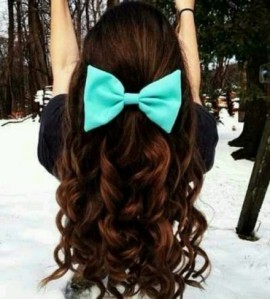
That’s all! Pretty easy to achieve voluminousness curls. This look is perfect for either a date night or a shopping spree. To accompany this look, I like to add either a shimmery head band or a cute bow, like my picture below. This picture was from Winter break when my family and I all visited North Carolina. My bow is from H&M. For looser curls, just finger through the fresh curls to achieve your desired look. For more of a beachy wave, take a brush or wide-tooth comb and gently go through the curls. If you are going to prefer looser curls or waves, then I suggest not applying hairspray at first or buying the larger barreled wand.
This look probably takes 15-20 minutes for long hair, like mine, and 10-15 minutes for short hair. If you have a curling want and don’t want to buy a wand, you can just wrap your hair around the barrel and not clamp it down. This look is very cost efficient and lasts all day and all night!


 `
`