DIY~ Nail Polish Made From Old Eyeshadows!

If I had a dollar for how many times I bought an eyeshadow and never used it…. Well now I can! I found this trick in a magazine and absolutely had to try it out. All you will need for this D.I.Y. is one concealable bag, one eyeshadow (preferably a pigment), scissors, clear nail polish, a paint brush or old concealer brush, and a container for your masterpiece. This nail polish comes out matte on your nails, but adding a clear top coat will give it that original shine. Let’s begin!

First, put your eyeshadow in a bag. If you want a certain color out of a palette, with strong force and some good tweezers you can peel the glue off of the compact and remove the specific shadow. Palettes don’t work too well because most colors will just blend into a brown or deep grey and be a waste of makeup and time. The more shimmery, the more shimmery nail polish. A swirled eyeshadow, such as Mac Heavenly Creatures Mineralized Eyeshadows, will create a tie-dye effect.

Crush the eyeshadow up in your bag. It is important to use a concealable bag, such as a Ziploc bag, so you don’t spill tiny eyeshadow flakes all over your floor. Try to crush as much of the shadow out of the compact tin. Be careful not to puncture the bag when crushing.

You want the shadow to be in pigment form. Mineral loose shadows are easier to crush up because they are already all crushed up. Try to go for a powdery consistency because it mixes better with the clear nail polish.

Cut off a small corner and pour it into a container. These small containers can be found at the Dollar Store or most makeup stores. Try to fill the container up with the pigment up until the cap screws down to. To clarify, don’t fill it all the way to the tippy top.

Grab your clear nail polish and begin to pour it into the container. It is best to fill it up halfway, mix it, then add more. The less you fill with clear nail polish, the less solution you will have and the grainier it will be from the eyeshadow.

Mix well with either old makeup brush or a cheap paintbrush. Paint it on your fingers and you are done! If you don’t like constantly be getting a brush out to use your nail polish, then simply pour the eyeshadow powder into the clear nail polish container and shake it up!


DIY~Matte Nails: 2 Ways!

Personally, I think that matte nails are so chic! Applying matte and glossy nail polish adds a creative contrast to just regular ol’ nail polish. This tutorial contains two versions to create these matte nails. The steps contain hardly any materials and are effective every time. Let’s begin!

Type one: Steam

image

All you will need is a bowl, boiling water, and any color nail polish. Paint your nails like you normally would with any type of nail polish. Using a base coat won’t alter the tutorial, but I just didn’t do it for the sake of the experiment.

image

Pouring the boiling water into a bowl might be challenging with wet nails. Instead, you could just hold your hand over the water-filled pan on the stove. Be careful not to get too close or you could get steam burns, or the hot water could hit your skin. Hold for about 30 seconds with the steam getting on your nails.

image

Excuse the quickie paint job, but your done! Altogether it took 1-2 minutes. Applying a top coat won’t be necessary or else it will add the shine back into the nails. Using a quality polish like O-P-I, Essie, or China Glaze will prevent chipping.

Type 2: Powder

image

You will need a powder (baby, corn starch, or baking powder, nail polish, and a brush. This brush can just be a regular powder brush that has been freshly cleaned. Paint your nails like regular.

image

While your nails are still wet, dust on the powder evenly onto each nail. Leave the powder on for about one minute.

image

While you are waiting, wipe the brush clean with a paper towel. Brush back over the nails after the minute is up and try to remove all of the powder. This may be difficult with the hand you don’t write with!

image

All done! The powder was a bit more difficult than the steam just because it is difficult to get off from the corners of your nails. Both were very effective, though. Apply a design with regular nail polish and your nails are going to look amazing!

DIY~ Peppermint Body Scrub!

With two days away from the Christmas holiday, people are scrambling for any idea that will keep them out of the long store lines. This DIY is simple, quick, and easily under $5. This peppermint scrub is perfect for anyone and the ingredients are items typically found in your pantry. Let’s begin!

PS2

The ingredients include a jar, I used a mason jar, 1 cup of sugar (Epsom salt or sea salt can be substituted), 1/2 cup of coconut oil, 1/2 tsp peppermint extract, optional 6-7 drops of red food coloring, candy canes, and a bag to crush the candy canes in. Sugar can be substituted for salt for a more coarse texture. I simply used whole coconut and melted it down into an oil. You can buy the coconut oil separate as an oil, though.

PS3

Mix sugar, coconut oil, and peppermint oil. For a more moisturizing scrub, add about 1/2 cup of olive oil to the mixture. Olive oil isn’t necessary, but will make a more liquefied substance.

Place atleast 5-7 candy canes depending on how much scrub mix you want to make into a bag and begin smashing. I used a rolling pin to crunch the candy canes into a near powder formula. You can either drop 6-7 drops of red food coloring into the candy cane mix for brighter canes or drop the food coloring into the sugar mix.

Spoon even amounts of the mixtures into your jars and decorate them with ribbons and stick-on letters. Pick out your  favorite bow and place it under the tree. Be sure that whomever you are gifting this body scrub to does not have any allergies to the ingredients. Wrap it up or simply enjoy it for yourself!

DIY~ Sweater Beanies for Fall

We all have those embarrassing sweaters hidden away in the back of our closets. Those holiday or stripped sweaters that make you want to burn any picture you were taken of it in. No need to worry any more! This DIY takes those unwanted sweaters and turns them into adorable head wear. Beanies are essential for those cold fall and winter months. Let’s begin!

This old sweater has been in my closet for years and may look fashionable, but is very unflattering to any shape. Other than that you will need a sewing machine, preferably with a denim needle to accommodate the thick fabric, sewing needle and coordinating thread, ruler, scissors, and sewing pins. If you don’t have a sewing machine then you can sew by hand, but it will take longer than just using a machine.

Cut a rectangle from the sweater, measuring about 12 inches (30.48 cm) wide and 17 inches (43.18 cm) long. This takes into account a beanie that is folded up about 1 inch (2.53 cm) at the bottom. You can decrease or increase the measurements, if needed. Along those lines, you can always not fold up the bottom of your beanie, or fold up a greater amount than I did. Depending on the type of sweater you are using, you can use the finished bottom edge for the bottom edge of your beanie. Some sweaters have a stretchy bottom, while others don’t.

Fold the sweater rectangle in half, lengthwise. Make sure the “front” sides are facing each other (unless of course, the stitching is the same on both sides of your sweater). Pin along the edge.

Sew along this edge. Adjust the tension/settings on your sewing machine so that you can sew the largest, loosest stitch possible. Also change your settings to a straight stitch.

Sew a straight stitch all around the top of the sweater “tube”, about .5 inch (1.27 cm) from the top edge.  Remember that you aren’t sewing the 2 layers together – just a straight stitch all around, on a single layer. Technically, you’re not sewing anything to anything. This stitch will be used to gather the fabric at the top. Tip: When you are sewing around the top and come back to the point where you started, make sure the stitch doesn’t actually meet at the ends. This will make it easier to pull and gather the thread at the next step.

Carefully pull the thread and gather the material together. With some adjusting and pulling, the fabric will eventually bunch. Tie and cut off the thread.

Adjust the settings on your sewing machine back to normal/the settings you were using before. Sew a straight stitch directly under the bunched up fabric. Tie off the thread, and cut the excess.

Turn the beanie right side out. The top of the beanie will have a bunched effect. If you decide to fold up the bottom of the beanie, you can hand sew a few stitches to keep the fold in place. Adding clear nail polish or top-coat on edges will prevent fraying.

And that’s all! If you wanted to add more pizazz then buying jewels or iron-on designs are an easy fix. Apply jewels with fabric glue and let it dry for 4-5 hours. Another way to personalize it is to dip-dye or solid dye the beanie. Dip it in bleach for dip-dye or colored dye and wash it out to prevent bleeding through. Sewing a fluffy pom-pom on the top of the beanie can create a more laid-back fall look. This beanie only cost $2 for extra thread and pins compared to the Asos.com beanie below costing $15.00.


DIY~ Destroyed Denim Shorts

Those rips and frays are okay nowadays! Destroyed denim has been very popular on the fashion scene. This DIY is very simple and can turn those unwanted mom jeans into adorable shorts! All you will need is a pair of jeans or jean shorts, scissors, an X-Acto knife, and if you want them to be ombre then bleach, a bucket, and gloves. I actually made this for my dear friend Natalie’s birthday vacation. So you will see her modeling them at the end. Afterwards you could stick studs through the fabric or hot-glue them for your own unique affect. Let’s begin!

If you are using jean pants, then put them on and make a marker with white crayon or pencil where you want to cut and slice them. Using another pair of shorts as a guide will help you get the angles correct. Start by cutting at a longer length in case you want them shorter. This will insure they won’t be too short! For the shape of mine, I cut them diagonally so they were higher on the sides (I like the look it gives when they are on). I also made the back slightly longer and rounded that way there is more coverage and they are more comfortable (I don’t like anything showing)!

Open a pair of scissors part way and run them back and forth along the bottom edge of the shorts. White threads should start to appear. Do this repeatedly on the back and front until lots of white threads are hanging down. Keep in mind that more will appear and they will be perfect after washing.

To begin, start by finding a picture of a pair of shorts that you want to base your rips off of. You definitely don’t have to do this, but it will help to give you a little more guidance. Fold a magazine, and place it inside of the shorts when you are using the X-Acto knife. To prep the shorts for distressing, apply an X-Acto knife’s blade at medium pressure diagonally across the areas of the shorts you want to distress. Make sure the entire area has been scored by your X-Acto knife.

To rip/destroy the shorts, take the X-Acto knife, and again applying medium pressure, run the blade repeatedly straight across the area you want to distress. This is going to take a little while, but as you continue to swipe the fabric with the blade, white threads will begin to show and little clumps of blue will form. Repeat this in all sections you have scored and want distressed.

Very gently separate the clumps of white threads by pulling them apart with your fingers (thread by thread). Be very careful, as you don’t want to rip the threads (they should be still attached on both sides), but you want to separate them from the blue material. This will help to define the distressed/ripped areas.

If you would like them to be light wash (like mine), put on gloves to protect your hands, fill up a large bucket with warm water, and and pour around a cup of bleach into it (depending on how much water you use, it could be different amounts. I put in too little at first and had to add a lot more. Go slow to find your correct amount.) Submerge the shorts fully in the water and let them sit, stirring often with a wooden spoon. If they are not lightening after 5-10 minutes add more bleach (1/4 cup at a time). Continue to stir and let them soak until they have lightened to your desired color (a note: they will be even lighter after you wash them). If you want to dip-dye them, then just dip the ends of the shorts into the bucket for several minutes. Or fill bleach into a spray bottle and spray the ends of the shorts and let it sit overnight.

Your dip-dye should look like this afterwards. Rinse well or hand wash the shorts in the sink to get the excess bleach out. Wash them again in a wash machine. I would recommend washing them alone if you want to be on the safe side, though because I hand washed them first, I was able to wash them with a dark load of laundry. Dry them completely in the dryer. This will help to soften the shorts and define/fluff the rips.

I decided not to dip-dye just because of the timing. But here is Natalie’s darling shorts. I used high waisted jeans and just cut them and completed this process. Good luck!

DIY~ Customizable Chalkboard

With the school summer break coming to an unfortunate end, this DIY is perfect for those people who just need to keep track of their daily lives. All this DIY takes is an old picture frame, spray paint primer, colored spray paint, chalkboard paint, and either a hot glue gun or super glue. Let’s begin!

First, start with your good ol’ picture frame. Make sure it contains the glass piece and not just the frame. You can find them at any craft store and extremely cheap at any thrift store, like Goodwill. Take all the pieces apart and clean the frame and glass.

Spray both the frame and the glass with Kilz Spray Primer. Just like priming your  face, this will ensure that the paint stays on. This process will take a lot of spraying so I suggest that you complete this DIY outside with a tarp, or protective covering down.

For the frame, you can pick any color or just leave it the original antique color. I chose Krylon’s Spray Paint in the color Ballet Slipper. This color is a really lovely pastel pink. Spray the frame with two even coats. Put it to the side to make sure that when you spray the glass it doesn’t get sprayed as well.

Next, spray the glass with Krylon’s Chalkboard Spray Paint. Spray the glass with two even coats, and then let it sit for 5 minutes and then spray it with two more coats.

It is best to let the frame and glass dry overnight or for at least 8 hours for the best use. Waiting this long will make sure that the chemicals dry and don’t chip away. If you wanted to apply a clear coat then that would be fine, but isn’t necessary. When putting it all together, put the glass in the frame and then apply either a hot glue or industrial glue. Then tighten the clasps on the frame.

And now you have an adorable chalkboard! If you wanted more use of it then attach small circular magnets onto the back of the frame’s corners with a hot glue gun.  The magnetized chalk board could be placed on the inside of a locker or on a bustling family’s fridge. Many people spray full-length mirrors with chalkboard paint for a wall size chalkboard. Add any ribbons or stickers to make it unique!

DIY~ Infinity & Wire Rings

Rings are one of my favorite arm candy accessories. The simpleness of a wedding ring to a large statement ring are so versatile. But how do you make your own rings and all under 10 minutes? This DIY is very simple and can be done by any one. The wire colors can be changed on all the styles. And you can add charms, beads, or paint the wires to all rings. Don’t be afraid to add you own pizzazz. Let’s begin!

diy infinity wire ring

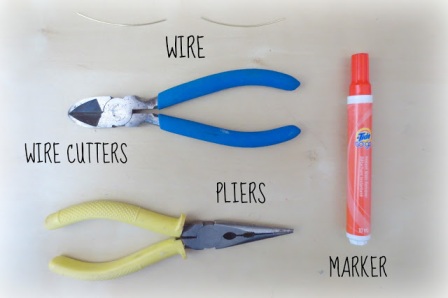
All you will need is pliers, wire, wire cutters, and any marker. If you have a ring sizer then that would work better than a marker. You can use any color or thickness of wire.

diy infinity wire ring

Take your pliers and curve the end of the wire towards a point on the wire.   Make sure that it touches as close as possible to the wire (mine get pushed in more later on).  Do the same thing on the other side and make that first curve.  I used my finger nail, but if you’re a bit more unsure, use some pliers to make that bend.

diy infinity wire ring

Take that end of the wire, the end that doesn’t already have the finished half of the sign, and flip it over, crossing it to the other side as you can see in the photo.

Cut off the excess wire and you have your infinity charm. If you wanted more of a full-circle infinity charm, then don’t cut the excess and just fit the rest of the wire to your finger.

diy infinity wire ring

Now, on to the band.   Wrap your second piece of wire around your marker.  Try to get it hugging as close to the marker as possible.   Then put it on your finger and push it together a bit more so that it fits better on your finger.  Cut off a bit of the excess, but not too much.  It should almost be able to form a full circle.

diy infinity wire ring

Curve  the ends of the band slightly so you can clamp the charm onto the ends. The ends should be like little hooks on the charm.

diy infinity wire ring

If everything turns out alright, you should have a bit of excess wire on the other side of the band, enough for you to repeat the previous band-curving steps.  Do that and slip that end of the band through the other end of the sign.  Clamp it down like before on the other side.

diy infinity wire ring

Tada! An original infinity ring that only took 10 minutes!

For other styles, do the same steps except make a heart charm out of the wire rather than an infinity symbol. For a bow ring, don’t make the clasps, just measure it around your finger and make sure there is excess to form the bow, then wrap the bow to form it’s shape.

To form a Love ring, follow the same steps as the infinity ring with the band that gets clamped down, but add the Love charm. To create the charm just mold into “Love” in cursive with the pliers. Cut it off after the “e” so it doesn’t get too long.

For a snake-like ring, make a small circle with the wire and then start zig-zagging it in a snake-like way. When you get halfway, wrap the wire around a pen full-circle then keep doing the zig-zagging until you want the design to finish. End with another little circle, and slip it on your finger!

To create the Chevron rings, simply wrap the wire around your finger or a marker and cut it off so it can go all the way around. Place it on your finger and then form the Chevron shape. Adding more Chevron rings adds more dimensions. To add more flare, paint the Chevron rings over the wire or add small beads or gems. The Chevron rings shouldn’t go past your knuckle.

DIY~ Flower Crowns

Flower crowns are an indie accessory that are flying off store shelves. These floral items aren’t only for Coachella attendees, but are also found on high fashion runways. To create these crowns, it only takes a small amount of supplies and easy steps. In this DIY I will show several different ways to make thicker and thinner flower crowns. They can be made with either silk flowers or real flowers. Let’s begin!

For all of mine I used silk flowers just because it tends to last longer and doesn’t wear or decay from the extended use. This process creates a thinner flower crown and is probably one of the easiest. To begin, all you will need is medium wire, preferably brown to match the stems, scissors, and your flowers. First, take the flower stems and put a few together. Wrap them together with about an inch and a half of wire. Cut off the excess wire so it doesn’t stab you in the head when you wear it. Keep adding more branches to the mix and coiling it with the wire. Base your shape into a circle as you bind the stems together. If you need to adjust the diameter of the circle, just loosen the wire, adjust, then tighten back up. Adding different color thin flower stems adds a summertime feel.

The second step is a bit more complicated and thicker. Start out doing the same process as the first crown, but wrap in the thicker white and yellow flowers in the front of the crown to create more dimension. If the bigger flowers won’t stay in or the wire keeps getting undone, then simply take a hot glue gun to the defected areas and let it sit for 15 minutes. Spreading the flowers out more will create a more equal crown.

The final step takes one more supply and more patience. The extra supply is floral tape and can be found wherever silk flowers are sold. To start, make your headband out of the wire and fit it to your head. Crop the flowers with the scissors so the stems are all the same length and there are no hanging leaves. Take two flowers and using the floral tape, wrap the stems to the wire headband. Repeat this process using different couples of flowers. Make sure the tape that you use matches the stem color or the crown will look sloppy. If you want to add pizazz to any of the crowns, adding ribbon to the back that wraps into a bow when you wear it will add the perfect touch. Simply string it through the headband and tape it  to the end of the headband. This works best if you have a headband format, rather than a crown format.

DIY~ Fringe Bikini Tops

Fringe bikini tops are a crazy hot trend this summer. The summer trends can be found here from Miami Fashion Week. Whether it is a haulter top or bandeau top, fringe swimwear has taken over worldwide. A fringe bikini top can range from $20-$50 in department stores, but this DIY only costs up to $10 worth of fabric. All you will need is an old bikini top, swimsuit fabric, scissors, sewing machine, and an eye for detail. Let’s begin!

First, cut out 1/2 inch wide, 11 inch long strips. I used this red swimsuit fabric I got from my local craft store. I asked for about 1/3 of this fabric. Swimsuit fabric is the best because regular fabric, obviously, won’t last in the water. Measure the long strip to the bikini top and then start cutting the fringe into it.

This step is optional, but does make the suit look better. Cut the fringe strings in half or angle the fringe. If you are sewing it to a bandeau, then I would suggest cutting the strips at an angle.

Now, sew the uncut part of the strip to the top of the bikini top. Using a zigzag stitch will ensure that the fringe stays on the bikini and doesn’t come off mid-splash.

pin_448

And that’s it! Attach some adorable printed bottoms and a cute sun-hat and you’re beach ready! You can also complete this with one-piece suits, as seen below.


DIY~ Heart Cut-Out Tanks

From backless shirts to peek-a-boo dresses, these small slits are taking the fashion world by storm. Many of these trends are very expensive in-store, yet there’s an easy way to accomplish this look within minutes. Creating this will also help recycle those old t-shirts crammed in the bottom of your drawers. This look can be done by anyone and can be worn anywhere. Let’s begin!

First, you will need an old t-shirt. The front pattern doesn’t matter, but you will only be cutting the back of the shirt. If you don’t have any, they are available at local craft stores. Depending on your cutting and shape skills you may need to trace something. Using any type of paper, draw a large heart and cut it out. This stencil should take up however much of the shirt you want to be showing. Now, cut off the sleeves to form a tank top. Start from the armpit and cut upward. Cut the collar hem off into a scoop neck. The bottom is optional, but to create a more classic tank-top cut an upward scoop neck.

step2photo-300x268

Place the heart on the back of the shirt. Trace with a white pencil, clothing pen, or a light crayon. These are easy to wash off in case of a mistake. Cut out the heart shape, and you’re done! You can cut more if you want a bigger heart shape. For a casual look, I like to accompany this with printed shorts, sandals, and chunky accessories. For a work ready look, I tag along colored pants, a cute cardigan, heels, and a long necklace. I wear most of these tanks in a casual settings. This creation looks fantastic with a printed bandeau  or adorable bathing suit. Just in time for summer!

5su4zd-l-610x610-shirt-green-heart-cut-out

Enter your email address to follow this blog and receive notifications of new posts by email.

  • 151,438 beauties!